tornado简介
tornado是使用Python语言编写的一款高性能,可扩展的web服务器框架。
在命令行中执行pip install tornado来安装tornado
本节项目实战所需使用的tornado子模块:
| 描述 |
web | tornado的基础 web 框架,包含了 tornado 的大多数重要的功能 |
template | 基于 Python 的 web 模板系统,这里的模板指的是html文件 |
ioloop | 提供了核心的 I/O 事件循环 |
使用tornado快速搭建http服务器
通过tornado下的web以及ioloop模块,即可快速地搭建http服务器。请同学们按照以下步骤进行操作:
(1) 创建simple_http_server_with_tornado.py并输入以下代码:
import tornado.ioloop
import tornado.web

class IndexHandler(tornado.web.RequestHandler):
    def get(self):
        self.write("Hello Python")


application = tornado.web.Application([
    (r"/", IndexHandler),
])


if __name__ == "__main__":
    # 定义server_port变量,表示服务器的监听端口号
    server_port = 8090
    application.listen(server_port)
    # 启动事件循环
    tornado.ioloop.IOLoop.instance().start()
(2) 进入windows命令行,切换到simple_http_server_with_tornado.py所在的目录,在命令行中执行python simple_http_server_with_tornado.py。
(3) 打开浏览器,在地址栏中输入:http://localhost:8090/, 敲下回车键,页面中输出的内容为:Hello Python。
配置项目的静态路径
静态路径是指静态文件的存储路径,项目中的静态文件主要包含html,css, js, 图片等文件。在对Application进行实例化时,可以在构造函数的static_path中指定服务器静态文件的路径。tornado默认将服务器运行的当前目录作为根目录,执行os.path.dirname(__file__),可获取服务器的当前目录。如需将服务器目录下的static作为静态目录,则可以参照以下代码:
os.path.join(os.path.dirname(__file__), "static")
tornado的模板系统
tornado 中的模板,主要是指HTML 文件。在模板文件中同样可以定义控制结构,以及使用表达式。控制结构使用 {% 和 %} 进行定义,例如 {% if len(items) > 2 %}。表达式则由{{ 和 }} 进行包裹,例如 {{ book["author"] }}。模板中的控制结构的结束位置需要用 {% end %}来做标记,表示语句块的结束。 模板文件中的if结构实例:
{% if 2 > 1%}
<p>2 > 1</p>
{% end %}
模板文件中的for结构实例:
<ul>
{% for number in range(5)%}
<li>{{number}}</li>
{% end %}
</ul>
在tornado.web.RequestHandler子类定义的处理方法中,通过执行self.render(template_file, **kwargs)方法,可以传递一个上下文参数,并对模板进行渲染。template_file表示模板文件的路径,kwargs表示传递给模板文件的上下文参数。加载模板文件前需要在Application对象中配置模板文件的路径,这样在执行render方法时,只需传递对应的文件名,这样tornado会自动在模板目录中加载该模板文件。
在Application类的构造函数中,通过指定关键字参数template_path的值,可以配置模板文件的路径。
现在同学们按照以下步骤,来练习如何在tornado中进行模板渲染:
(1) 更新simple_http_server_with_tornado.py,并输入以下代码:
import os
import tornado.ioloop
import tornado.web

class IndexHandler(tornado.web.RequestHandler):
    def get(self):
        greeting = "Hello, Python"
        self.render("index.html", greeting = greeting)


if __name__ == "__main__":
    server_port = 8090

    # 定义字典变量 settings,保存模板文件的路径
    settings = {
    # 在template_path中指定模板文件的路径
        "template_path": os.path.join(os.path.dirname(__file__), "templates")
    }

    application = tornado.web.Application(
        [(r"/", IndexHandler)],
        **settings
        )

    application.listen(server_port)
    tornado.ioloop.IOLoop.instance().start()
(2) 在项目根目录中创建templates目录
(3) 在templates目录中创建index.html文件
index.html文件中的内容:
<p>{{greeting}}</p>同学们要注意的是模板文件中的模板变量需要与render函数中的参数名一一对应。
(4) 打开浏览器,在地址栏中输入:http://localhost:8090/, 敲下回车键,页面中输出的内容为:Hello,Python
elasticsearch简介
elasticsearch是一个高扩展,分布式的实时搜索和分析引擎,利用elasticsearch可以快速地实现一个搜索服务器。从数据管理的角度来看,elasticsearch是一种面向文档的数据库,其存储的数据在elasticsearch中被称为文档。在elasticsearch中,需要先建立索引,这里的索引类似于MySQL中的数据表。在windows系统中安装elasticsearch:
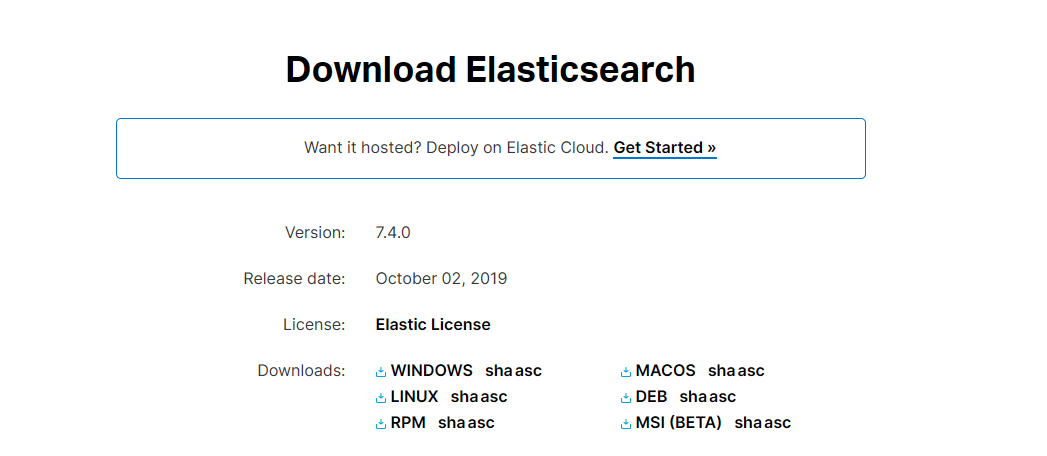
(1)进入elasticsearch的官方下载页:https://www.elastic.co/cn/downloads/elasticsearch

在页面中点击WINDOWS链接,开始进行windows版本的elasticsearch的下载。下载完毕以后,将压缩包解压到指定目录。解压完毕以后,执行bin目录下的elasticsearch.bat文件,以启动elasticsearch服务器。启动过程中需要1-2分钟时间,读者需要耐心等待。elasticsearch启动成功以后,再打开浏览器,在地址栏中输入:http://localhost:9200/。
elasticsearch的基本数据类型
在本节教程中仅介绍与该实时搜索项目相关的数据类型。
字符串类型
(1) text类型:text类型表示该字段内容会被elasticsearch中的分词器拆分成一个一个词项。
例如对于一个查询串,elasticsearch中的分词器会对查询串进行分词,然后根据拆分出的词项在elasticsearch中进行搜索,最后将搜索的结构进行聚合。
(2) keyword: 设置了keyword类型的字段不会被分析器进行词项的拆分,适合进行精确匹配的搜索场景。
数值类型:
(1) integer:表示该字段的数据类型是整型
(2) float: 表示该字段的数据类型是单精度浮点类型
(3) double: 表示该字段的数据类型是双精度浮点类型
elasticsearch中的mapping
elasticsearch中的mapping类似于关系型数据库中的表结构定义,其主要用途为定义elasticsearch索引中的字段名,以及字段的数据类型、相关属性。
elasticsearch中的查询SQL
elasticsearch使用基于JSON的查询DSL来定义查询语句,DSL表示领域特定的语言。本节仅介绍在elasticsearch中常用的多匹配查询multi_math。multi_match查询格式举例:
query = {
            "query":
                {
                    "bool": {
                        "must": [{
                            "multi_match":
                                {
                                    "query": "learn python" ,
                                    "fields": ["language", "description"]
                                }
                        }]
                    }
                },
            "from": 0,
            "size": 10
        }
在上文的查询语句中,multi_match中的query字段用来定义待查询的内容,fields字段表示根据文档中的哪些字段进行匹配。from用于分页,size表示每页的大小。
使用elasticsearch的核心流程
(1) 在elasticsearch中创建索引
(2) 在指定的elasticsearch索引中插入数据
(3) 使用elasticsearch的搜索api来搜索数据
项目的目录组织
在前面几小节的内容中,已经分别介绍了tornado框架以及elasticsearch的基础知识 。在掌握这些知识的基础上,可以着手开发一个基于tornado,Elasticsearch的web搜索系统。项目的目录组织,如下所示:
├── app.py
├── templates
│ ├── index.html
│ ├── result.html
├── static
│ ├── images
│ │ ├──logo.png
│ ├── js
│ │ ├──jquery-3.4.1.min.js
│ │ ├──search.js
│ ├── css
│ │ ├──index.css
│ │ ├──result.css
├── dal
│ ├── database.py
├── utils
│ ├── es.py
├── config
│ ├── __init__.py
对目录结构的说明
(1) app.py是应用程序的入口函数,负责启动tornado服务器。
(2) templates目录下存放的是tornado的模板文件,index.html对应的是搜索首页,result.html对应的是搜索的结果页。
(3) static表示项目的静态目录,images目录存放项目所需的图片文件,js目录存放javascript脚本文件,css目录存放样式文件。
(4) dal表示的书数据访问层,database.py对数据库的操作进行了封装。
(5) utils目录存放工具类的脚本程序,es.py负责创建elasticsearch索引,以及将mysql中的数据插入到elasticsearch中。
(6) config目录中的__init__.py中定义项目的配置信息
基于tornado,ElasticSearch的web搜索系统
请同学们按照以下步骤进行操作。
(1) 安装elasticsearch模块
进入windows命令行,执行pip install elasticsearch安装elasticsearch模块
(2) 编辑database.py, 以及__init__.py
打开database.py文件,输入以下代码:
# __author__ = 薯条老师
# 导入MySQLdb模块
import MySQLdb
from config import DBConfig,DatabaseType
from elasticsearch import Elasticsearch
from elasticsearch import helpers


class Database:
    """
    对数据库操作进行了简单的封装
    """
    # 类属性__db__instances是一个字典类型,用来保存数据库的实例
    __db_instances= {}
    @classmethod
    def get_instance(cls, db_type= DatabaseType.MYSQL):
        """
        定义get_instance类方法,用来获取数据库对象的单例
        所谓的单例就是一个类只有一个实例,调用该方法每次获取到
        的都是同一个数据库实例,,type默认为MYSQL类型,表示
        默认获取的是mysql的数据库实例
        """

        if db_type not in cls.__db_instances:
            # 如果不存在,就构造一个Database的实例对象
            cls.__db_instances[db_type] = Database(db_type)
        return  cls.__db_instances[db_type]


    def __init__(self, db_type=DatabaseType.MYSQL):
        """
        :param db_type: 数据库的类型,数据库的类型在DatabaseType中进行了定义
        默认为MYSQL类型,表示创建mysql类型的数据库实例
        """
        self.__db_type = db_type
        self.__db = self.__get_database()
        self.__cursors = {}


    def __get_database(self):
        db = None
        # 根据类型字段,来创建对应的数据库实例
        if self.__db_type == DatabaseType.MYSQL:
            try:
                db = MySQLdb.connect(DBConfig[DatabaseType.MYSQL]["host"],
                                     DBConfig[DatabaseType.MYSQL]["user"],
                                     DBConfig[DatabaseType.MYSQL]["password"],
                                     DBConfig[DatabaseType.MYSQL]["database"],
                                     charset="utf8"
                                     )
            except IOError:
                db = None
        elif self.__db_type == DatabaseType.ELASTICSEARCH:
            db = Elasticsearch([{"host": DBConfig[DatabaseType.ELASTICSEARCH]["host"],
                                 "port": DBConfig[DatabaseType.ELASTICSEARCH]["port"]}])
        return db


    def batch_insert(self, sql = None, args = None, data=None):
        """
        :param sql: 客户端传递的查询语句
        :param args: 查询语句对应的参数
        :param data: 批量插入的数据
        :return:True表示批量写入成功,False表示失败
        """

        status = False
        if not self.__db:
            return status

        if self.__db_type == DatabaseType.MYSQL:
            # 如果数据库的实例对象为MySQLdb,则执行executemany方法来进行批量写入
            if "mysql" not in self.__cursors:
                self.__cursors["mysql"] = self.__db.cursor()
            try:
                self.__cursors["mysql"].executemany(sql, args)
                self.__db.commit()
                status = True
            except:
                status = False

        elif self.__db_type == DatabaseType.ELASTICSEARCH:
            """
            如果数据库类型为ELASTICSEARCH,则通过helpers模块的bulk
            方法来进行数据的批量插入
            """
            try:
                helpers.bulk(self.__db, data)
            except:
                status = False
        return status


    def create_database(self, **params):
        """
        :param params: 可变参数,
         params中的name表示数据库名,body表示创建数据库的额外参数
        :return: 返回一个状态信息,True表示创建成功,False表示创建失败
        """
        status = True
        if self.__db_type == DatabaseType.ELASTICSEARCH:
            es_index = params.get("name", None)
            mappings = params.get("body", None)
            if not self.__db.indices.exists(index = params["name"]):
                try:
                    self.__db.index(index = es_index, body = mappings)
                except:
                    status = False
        return status


    def query(self, ql, *args):
       """
       :param ql:表示查询语句
       :param args:表示查询的参数
       :return:
       """
       data = None
       if self.__db_type == DatabaseType.MYSQL:
           if "mysql" not in self.__cursors:
               self.__cursors["mysql"] = self.__db.cursor()

           if not args:
               self.__cursors["mysql"].execute(ql)
           else:
               self.__cursors["mysql"].execute(ql, args)
           data = self.__cursors["mysql"].fetchall()

       elif self.__db_type == DatabaseType.ELASTICSEARCH:
               data = self.__db.search(index=args[0], body=ql)

       return data
打开__init__.py文件,并输入以下代码:
class DatabaseType:
    """
    定义数据库类型的枚举变量
    """
    MYSQL = 1
    ELASTICSEARCH = 2


# DBConfig是一个字典类型,存储了数据库的配置信息
DBConfig = {
    DatabaseType.MYSQL:{
        "host": "localhost",
        # 填写安装mysql时设置的登录账户名
        "user": "user",
        # 填写安装mysql时设置的登录密码
        "password": "password",
        "database": "crawler"
    },
    DatabaseType.ELASTICSEARCH:{
        "host": "localhost",
        "port": 9200,
    },
}
(3) 将MySQL中的数据批量插入到elasticsearch
编写utils目录中的es.py, 查询mysql中的数据,并将数据批量写入到elasticsearch中,创建的索引为github_repos,索引的类型为github。启动成功elasticsearch服务器以后,进入到windows命令行,再切换到项目根目录下的utils目录,执行python es.py。程序执行完毕以后,打开浏览器,在地址栏中输入:http://localhost:9200/github_repos/_search?q=language:python, 敲下回车键后如有看到github项目信息的输出,则说明执行成功。
(4) 新增搜索结果页,并定义结果页面的样式
templates中的index.html表示搜索首页,其代码为:
<html>
<head>
<link rel="stylesheet" type="text/css" href="{{static_url('css/index.css')}}" />
<script type="text/javascript" src="{{static_url('js/jquery-3.4.1.min.js')}}"></script>
<script type="text/javascript" src="{{static_url('js/search.js')}}"></script>
<meta http-equiv="Content-Type" content="text/html; charset=utf-8">
<title>Github 项目搜索</title>
</head>

<body>
    <div id="wrapper">
        <div>
            <div id="logo"><img width="271" height="106" src="{{static_url('images/logo.png')}}" alt="logo" /></div>
            <div>
                <form action="/search/" method="get">
                <input type="text" id="query" name="query"/>
                <input type="submit" id="submit" value="搜索" />
                </form>
            </div>

       </div>
    </div>

</body>
</html>
templates目录中的results.html文件表示搜索结果的列表页,文件的代码为:
<html>
<head>
<link rel="stylesheet" type="text/css" href="{{static_url('css/result.css')}}" />
<script type="text/javascript" src="{{static_url('js/jquery-3.4.1.min.js')}}"></script>
<script type="text/javascript" src="{{static_url('js/search.js')}}"></script>
<meta http-equiv="Content-Type" content="text/html; charset=utf-8">
<title>Github 项目搜索</title>
</head>

<body>
    <div id="wrapper">
        <div>
             <form action="/search/" method="get">
             <img width="140" height="45" src="{{static_url('images/logo.png')}}" alt="logo" />
             <input type="text" id="query" name="query"/>
             <input type="submit" id="submit" value="搜索" />
             </form>
        </div>

        <div id="search-results">
            <p id="prompt">为您找到的相关结果约{{hits['total']}}个,每次显示最匹配的前20条数据</p>
            <p id="desc">
            基于tornado与Elasticsearch的web搜索系统。使用github api从github中爬取
            项目信息,然后存储到mysql数据库中。再将mysql中的数据写入到elasticsearch,
            实现数据的实时搜索。
            </p>

            <ul id="results">
                {%for result in hits['hits']%}
                <li>
                    <div>
                    <img width="30" height="30" src="{{result['avatar_url']}}" />
                    <a href="{{result['html_url']}}">{{result['description']}}</a>
                    <p>作者:{{result['author']}}•项目名称:{{result['name']}}•{{result['stars']}}人喜欢</p>
                    </div>
                </li>
               {%end%}
            </ul>
         </div>
    </div>
</body>
</html>
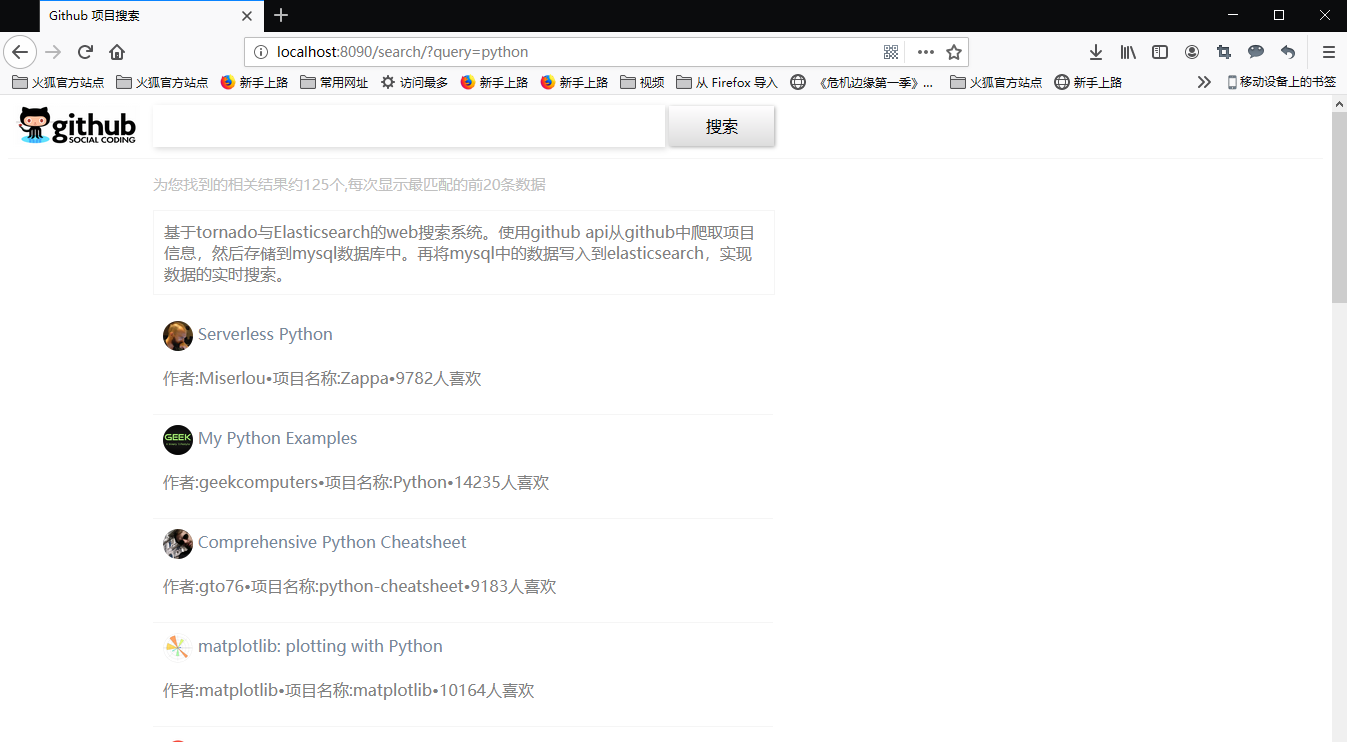
在模板文件中使用到了模板变量hits,在第4步的操作中,会将hits变量传递至模板文件中。搜索结果页的显示页面:

static目录中的result.css,用来对搜索结果页定义样式。result.css中的css代码为:
div#wrapper{
margin-bottom:100px;
}
div.search-form{
margin:0;
padding-bottom:10px;
border-bottom:1px solid #F5F5F5;
}
form{
margin:0;
padding:0;
}
input,img{vertical-align:middle;}

input{
line-height:40px;
}

input#query{
border:0;
box-shadow: 2px 2px 5px rgba(0, 0, 0, 0.15);
width:512px;
}
input#submit{
background: #DDDDDD;
background:-moz-linear-gradient(top,#fffeff,#dddddd);
background:linear-gradient:(top, #ffffff, #dddddd);
border: 0;
font-size: 16px;
line-height:40px;
padding: 0;
width: 105px;
box-shadow: 1px 1px 3px rgba(0, 0, 0, 0.35);
}

div#search-results{
padding:0;
padding-left:145px;
}
p#prompt{
color:#C0C0C0;
font-size:15px;
}
p#desc{
color:gray;
width:600px;
padding:10px;
border:1px solid #F5F5F5;
}

ul#results{
padding:0;
list-style:none;
}

div.info{
width:600px;
padding:10px;
border-bottom:1px solid #F5F5F5;
color:gray;
}
img.avatar{
border-radius:20px;
}
a{
text-decoration:none;
color:#778899;
}
div#pages a{
border:1px solid  #5F9EA0;
padding:8px;
padding-left:15px;
padding-right:15px;
}
css文件中使用了css3的属性:border-radius,来定义边框的圆角。
(4) 将查询结果渲染到列表页
打开项目根目录下的app.py, 并输入以下代码:
import os
import tornado.ioloop
import tornado.web
from dal.database import Database,DatabaseType

class IndexHandler(tornado.web.RequestHandler):
    def get(self):
        self.render("index.html")


class SearchHandler(tornado.web.RequestHandler):
    def initialize(self, es):
        self.__es = es

    def get(self):
        query = self.get_argument('query', '')

        # from用于实现分页
        from_ = self.get_argument('from', 0)
        # 定义elasticsearch的搜索语句
        github_query = {
            "query":
                {
                    "bool": {
                        "must": [{
                            "multi_match":
                                {
                                    "query": query,
                                    "fields": ["language", "description"]
                                }
                        }]
                    }
                },
            "from": from_,
            "size": 20
        }

        """
        (1)执行Database实例对象的query方法
        (2)在Database类中,对mysql,elasticsearch的查询操作进行了封装
        """
        results = self.__es.query(github_query, "github_repos")
        max_desc_length = 40

        hits = {"total": results["hits"]["total"]["value"],  "hits":[]}
        for hit in results["hits"]["hits"]:
            if len(hit["_source"]["description"]) > max_desc_length:
                hit["_source"]["description"]=hit["_source"]["description"][:max_desc_length]+"..."

            hits["hits"].append(hit["_source"])

        self.render("result.html", hits = hits)


if __name__ == "__main__":
    server_port = 8090

    # 定义字典变量 settings,保存静态文件和模板文件的路径
    settings = {
        # 在static_path中指定静态文件的路径
        "static_path": os.path.join(os.path.dirname(__file__), "static"),

        # 在template_path中指定模板文件的路径
        "template_path": os.path.join(os.path.dirname(__file__), "templates"),

        # debug表示是否开启调试模式,在调试模式中,对项目文件的修改会立即生效
        "debug": True,
    }

    application = tornado.web.Application(
        [
            (r"/", IndexHandler),
            (r"/search/", SearchHandler, dict(es=Database.get_instance(DatabaseType.ELASTICSEARCH))),
        ],
        **settings
        )

    application.listen(server_port)
    tornado.ioloop.IOLoop.instance().start()
在app.py中,定义了/search/路由,同时在/search/路由对应的处理方法中传递了elasticsearch的实例对象,然后在get方法中根据查询参数去elasticsearch服务器中实时搜索,将最后查询的结果传递给模板文件result.html。
(5) 在浏览器中进行测试
测试前,需要先启动elasticsearch服务器。同学们现在进入windows命令行,切换到项目所在的根目录,然后执行python app.py。接着在浏览器的地址栏中输入:http://localhost:8090/,敲下回车键后,出现如下页面:

在输入框中输入python, 按下回车键,出现如下页面:

最具实力的小班培训
薯条老师在广州做Python和Java的小班培训,一个班最多10人。不在广州的同学可以报名线上直播班,跟线下小班的同学们同步学习。打算参加小班培训的同学,必须遵守薯条老师的学习安排,认真做作业和项目。把知识学好,学扎实,那么找到一份高薪的工作就是很简单的一件事。
(1) Python后端工程师高薪就业班,月薪11K-18K,免费领取课程大纲
(2) Python爬虫工程师高薪就业班,年薪十五万,免费领取课程大纲
(3) Java后端开发工程师高薪就业班,月薪11K-20K, 免费领取课程大纲
(4) Python大数据分析,量化投资就业班,月薪12K-25K,免费领取课程大纲
扫码免费领取Python学习资料:
[object Object]


